Monday, 14 November 2016

Mr Skellie Bones

Halloween has come and gone, once again, and I still haven't posted about Mr Skellie Bones. So here goes...

It all began when our son, then aged 6, attended a friend's birthday party that included a dark and scary 'Ghost House' for the children to explore. The clever parents and granny had closed off a couple of rooms in their house, made them very dark and decorated them with very scary bits and bobs. In the bedroom they created a scary person sleeping in the bed by stuffing some kids clothing and adding a hat. For months after the party my son begged me to please make him a life sized skeleton pillow that he could put in his bed to scare his friends.

I eventually agreed. I'd make the skeleton pillow.

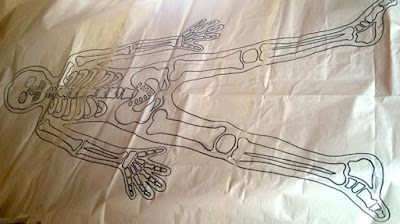
I started by pasting together some news print paper and drawing my son's outline. (he wanted it life size after all) It took me a long time to figure out just how I was going to go about it. I started drawing the skull and bones onto the paper, changing and simplifying the design as I went along. I decided to make the basic pillow out of a sturdy black cotton fabric, and then to cut the skeleton out of white felt which I glued on. (I probably should have sewn these on, but it really was taking a lot longer to make than I thought it would.) I managed to finish it in time for his 7th birthday. He was very excited and happy to finally receive his skeleton friend.

Mr Skellie Bones has been a member of our family for a couple of years now. He is the 'other brother' to our 3 children. He enjoys going on outings, building Lego, and playing dress up. The other day he even won his first medal. Apparently he was awarded this medal for being 'Totally AWESOME!' He's a well loved skeleton.

Here is the making of Mr Skellie Bones, in pictures.


My son's drawing of a skeleton.

Planning and simplifying the skeleton design.


The finished pattern.
 
The finished pattern.
Cutting the skull, teeth and bones out of white felt.
Each piece was numbered so that I knew where it had to go.
This took a lot of time, concentration and a huge amount of patience.
 
Final construction. Gluing, sewing and stuffing.
 
Introducing... Mr Skellie Bones 

Result!
 
A very happy boy on his 7th birthday.

The kids and Skellie having a "sleepover".


Tuesday, 17 May 2016

Greg Heffley - World Book Day

This year our son, who is in Grade 3, chose to dress up as "Greg Heffley" to celebrate World Book Day at school.
Gregory "Greg" Heffley is the hero/antihero protagonist of the realistic fiction book series Diary of a Wimpy Kid created by American cartoonist Jeff Kinney.

It was an easy and fairly quick dress up costume to put together. He wore a white vest, his old (now too small for him) black tracksuit trousers, white socks, white trainers and a mask. I made the mask using a sturdy piece of white card. I copied the face from one of the illustrations in the book. I drew it in pencil first and then coloured it in using a black permanent marker. I had some transparent elastic (that I usually use for making beaded necklaces) that I threaded through small holes I'd made using a needle, and tied it to hold the mask in place.

It was his idea to make a "side fitting" mask which turned out to be very effective and much more practical than a front fitting mask would have been. A front fitting mask would have required eye holes and may have spoiled the face a bit.
And...

TA DA!


He looked super cute, don't you think?
 

Thursday, 24 March 2016

Making Easter Magic

Well, I say "Easter Magic" because I feel like I managed to pull a... um... rabbit, out of a hat!

It was the morning of the twins' preschool Easter market and I hadn't made any clever Easter themed crafts, or baked any yummy Easter treats for them to take along to sell. Eeeek!!

I had to make a plan, and quickly!

After dropping the girls at school, and with only an hour (and a bit) to spare before I had to return with my wares, I headed for the nearest supermarket. I was thinking that I could maybe buy some Easter chocolates or sweeties to sell.
I walked into the shop and was greeted by a display of Hot Cross Buns. Some with raisins, some with chocolate chips. It gave me an idea!! I hurried home.

Hot cross buns. Some with raisins, some with chocolate chips.

I rolled them flat in an attempt to make them go further. It worked.

Using a rabbit shaped cookie cutter, I cut out as many as I could.
Sometimes including the 'join'.
 
 
TA DA!!
 
 
Hot Cross Bunnies!
 
If I'd had more time, I would have added a thin layer of white glacé icing
and perhaps a Jelly tot tail.
Maybe next time.